Bluetooth Low Energy Beacons (BLE)
Results at a glance

4 variants
-
AC power detection
-
Temperature & humidity
-
Water/Leak detection
-
Door Status

$18/unit
Production Cost
BOM + PCB fabrication + assembly
Significantly below commercial competitors ($50–$120)

1.5 years
Battery Life
On a CR2477 coin cell, with clear path for further extension through duty cycling and software adjustments

Modular and Scalable Design
Standardized architecture across all variants, making future modification or new sensor integration easier
Overview
During my final year at Anáhuac Mayab University, I completed a year-long Practicum at VAMIA Solutions in Mérida, Yucatán. A client had requested a set of wireless sensors for monitoring critical conditions in IT sites and small data centers. The initial scope included three beacons — temperature & humidity, AC voltage (power-loss) detection, and water/leak detection. By the end of the project, the client requested a fourth variant for door status detection.
I was assigned full responsibility for the embedded systems portion of the project: electronics design, firmware development, PCB layout, prototyping, and delivery of fully functional hardware prototypes. My work stopped once the beacons reliably delivered data to the company’s existing gateway; the software team then handled the Vantiq cloud dashboard.
From the beginning, the company gave me complete freedom in the technical execution, with three clear constraints: use PIC microcontrollers to allow future expansion and easy modification, employ the BT832 module strictly for BLE advertising, and power the beacons with a specific coin-cell battery. I embraced these requirements and designed a highly standardized, modular architecture across all four beacons. This approach made the circuits and firmware simple, repeatable, and easy to maintain or adapt for new sensor types in the future.
The core objective to develop reliable, compact, and truly affordable BLE beacons that could deliver accurate monitoring at a fraction of the cost of existing market solutions. I took this challenge seriously, focusing on low-power design, robust UART communication, and clean integration with the company’s gateway.

The result was a family of four working prototypes that met the client’s needs while demonstrating the excellence in embedded systems and mechatronics I strive for in every project.
Intellectual Property Note
All hardware designs, circuit architectures, firmware, PCB layouts, and physical prototypes developed during this project are the exclusive intellectual property of VAMIA Solutions.
The content presented on this page — including photographs of the prototypes I built, high-level diagrams, and process descriptions — focuses solely on my personal technical contributions as the embedded systems engineer during my final-year Practicum at the company. I am sharing only the prototypes and selected development milestones to demonstrate the hands-on work I performed and am permitted to disclose.
For confidentiality reasons, full schematics, detailed PCB layouts, complete BOMs, exact component values, and proprietary implementation details have been redacted or omitted.
This section serves to showcase the skills, rigor, and excellence I apply to every engineering challenge while fully respecting the ownership and confidentiality agreements with VAMIA Solutions.
Development Process

1
Circuit Simulation
The project began with the barebones simulation in Proteus to validate sensor interfaces, signal conditioning, and UART communication between the PIC microcontroller and the BT832 BLE module.

6
Packet Structure Refinement
The location of the data package was determined within the broadcasted string through iterative testing and debugging.

11
Completed Beacon Prototypes
The finished PCB assembly of the temperature & humidity, voltage detection, and water detection beacons.

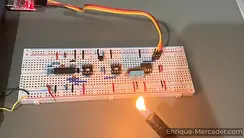
2
Integrated Protoboard Testing
With only one PIC and one BT832 module available, I integrated all three sensor circuits (temperature & humidity, voltage detection, and water detection) onto a single prototype board for efficient validation.

7
Real-Time Cloud Visualization
The software team developed a temporary dashboard in the Vantiq platform to visualize and validate the data broadcasted by the beacons in real time through the gateway.

12
Door Status Beacon
Following an additional client request, I designed, built, and integrated the door status beacon variant.
3
Sensor Interface & UART Testing
Physical testing was performed on breadboard, verifying sensor data acquisition and UART protocol correctness using RealTerm.

8
Final Schematic & PCB Design
I designed the final circuit schematic and did the PCB design for all beacons.

13
Voltage Detection Demonstration
Functional testing of the voltage detection beacon confirmed reliable AC power-loss sensing.

4
BLE Advertising – Beacon Name
Successfully implemented and verified BLE advertising with a custom beacon name from the BT832 module, visualized using nRF Connect.

9
3D Case Selection & Integration
During the PCB development phase, I evaluated commercially available enclosures and selected the most suitable model for the beacons. the 3D printed models were used for the prototypes.

14
Water Detection Demonstration
The water/leak detection beacon was validated with real-world leak scenarios.

5
BLE Advertising – Data Packet
Progressed to embedding actual sensor data into the advertisement packet and confirmed transmission with nRF Connect.

10
Final PCB Assembly & Troubleshooting
After having the PCBs manufactured in china, I soldered the PIC microcontroller and supporting components, methodically troubleshooting any issues to ensure reliable operation.

15
Temperature & Humidity Demonstration
The temperature and humidity beacon delivered accurate environmental readings under operational conditions.
Technical Deep Dive
System Architecture
System Architecture

I designed all four beacons (temperature & humidity, voltage detection, water/leak detection, and door status) around a clean, standardized three-block architecture:
-
Sensor Interface – tailored conditioning for each measurement type.
-
PIC12F1840 Low-Power Controller – the system brain responsible for sensor reading, event detection, data processing, and precise timing.
-
BT832 BLE Module – used exclusively in advertising mode, interfaced via UART to broadcast sensor data to the company’s gateway.
This modular and reusable design made the beacons easier to produce, modify, or adapt for future sensor types while respecting the company’s requirement to use PIC microcontrollers and the BT832 module.
Sensor interfaces were kept simple and practical for real-world IT environments:
-
Temperature & humidity used an internal sensor.
-
Voltage detection employed a flexible antenna placed alongside the monitored AC wire and secured with a Velcro strap (non-invasive).
-
Water/leak detection used a flexible conductive probe positioned where water might pool.
-
Door status used a simple reed switch.
Firmware Development
Firmware Development

The firmware (developed entirely in C) was written with modularity and maintainability in mind. Common routines for sensor acquisition, UART communication, packet formatting, sleep management, and watchdog handling were standardized across all beacon variants. This approach not only simplified debugging and testing but also made future code modifications or expansions straightforward.
Key Engineering Hurdles & Solutions
Key engineering hurdles & solutions
Every ambitious project brings challenges, and this one was no exception. Here are the main technical hurdles I faced and how I overcame them:
-
Rapid familiarization of BLE technology
I had never worked with Bluetooth Low Energy before — in fact, I had never even heard of it prior to this project. Through intensive self-study and guidance from the VAMIA team, I quickly grasped the advertising mode concept and successfully implemented reliable BLE transmission using the BT832 module.
-
Working with an undocumented BLE module
The company requested the BT832 module for advertising-only operation, but they had not used it in this exact configuration before. The official command table contained errors, inconsistencies, and missing information. I systematically reverse-engineered the module’s behavior through extensive testing and created a clean, reliable UART command interface that worked flawlessly. I also documented the correct behavior and handed it over to the team for future use.
-
PIC microcontroller optimization
The project was started with a PIC12F629 that lacked a native UART peripheral, although I overcame that issue by developing a custom UART in-code using interrupts and arrays, we ended up migrating to the PIC12F1840 for its integrated UART, better ultra-low-power performance, and available peripherals. I was able to reuse the code and libraries already developed, but I had to read and familiarize myself with the new PIC and datasheet in order to configure all registers appropriately and use all functions.
-
Mechanical & PCB co-design challenge
The classic chicken-and-egg problem: the PCB must fit the case, but the case dimensions depend on the PCB. I solved this by first designing a provisional PCB with the components next to each other to see the minimum size I would require, then I selected a commercial enclosure and iteratively refined the PCB to to achieve a precise and compact fit.
-
SMD assembly & manufacturing
This was my first time designing and hand-assembling SMD PCBs. The boards were manufactured in China, and I personally handled all component placement and soldering, learning proper techniques for fine-pitch parts along the way.
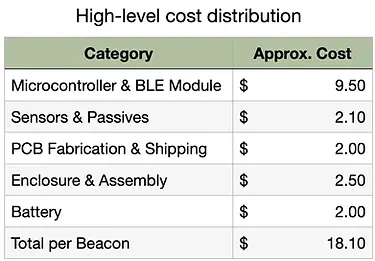
Cost Breakdown
Cost Breakdown
One of the key objectives of the project was to create beacons that were significantly more affordable than existing commercial solutions (typically priced between $50 and $120 per unit).
Through careful component selection, optimized PCB design, and efficient assembly, I achieved a prototype-level manufacturing cost of approximately $18 per beacon.
This cost structure was achieved while maintaining reliability and ease of installation. With higher production volumes or a potential single-chip Nordic migration, further reductions of 30–40% are clearly feasible.
Takeaways
Takeaways
This Practicum project marked several important milestones in my development as a mechatronics engineer:
-
It was my first experience delivering hardware for a real commercial application rather than academic lab work. I proactively researched best practices for professional products (reverse battery protection, watchdog timers, status LEDs, etc.) and incorporated them into the design.
-
I learned to write clean, standardized, and well-commented firmware from the start. The VAMIA team particularly appreciated how readable and maintainable the code was.
-
I discovered the power and convenience of PIC datasheets. Thorough datasheet mastery became one of my strongest skills during this project.
-
I gained valuable insight into the iterative nature of product development — especially the interplay between PCB design and mechanical enclosure selection.
-
Most importantly, I pushed myself to deliver the highest quality possible. This self-imposed drive for excellence accelerated my growth more than any single technical challenge.
The project also highlighted opportunities for further improvement: the beacons could have been made significantly more compact by migrating to a single Nordic SoC (eliminating the PIC and UART interface), but the team preferred the current modular PIC-based approach for future flexibility.